How to integrate Salesforce Marketing Cloud with your Salesforce org
Are you looking to unify your customer and marketing data in one place for optimizing your marketing strategies?
If you are, then the solution lies in integrating the Salesforce Marketing Cloud with your Salesforce org. You can achieve this with Salesforce Marketing Cloud Connect Integration.
This integration will provide you with complete access to every customer detail across any touchpoint, helping you personalize your digital marketing strategy. So, Find the step-by-step instructions to integrate Salesforce Marketing Cloud into your Salesforce org shared in the subsequent sections. Read on!
Pre-integration requirements
Here are the prerequisites for integrating Marketing Cloud Connect with your Salesforce org.
- Marketing Cloud Connect version 5.494 or higher
- Enable Multi-org user
- Use Connected App Authentication
- Hold the Salesforce CRM Audience from sending Contacts, Leads, Reports, or Campaigns until the upgrade is complete.
- Two users for the integration: Marketing Cloud user and Salesforce Admin user.
- Use a Customer Profile Center
- Subscriber Key for Marketing Cloud Connect
Innovations in Commerce Cloud
Installing the Marketing Cloud package in Salesforce
Step 1: Install the Marketing Cloud in Salesforce org using the URLs provided below
You install the package for Admin, all users, or specific profiles.
Step 2: Add Permissions
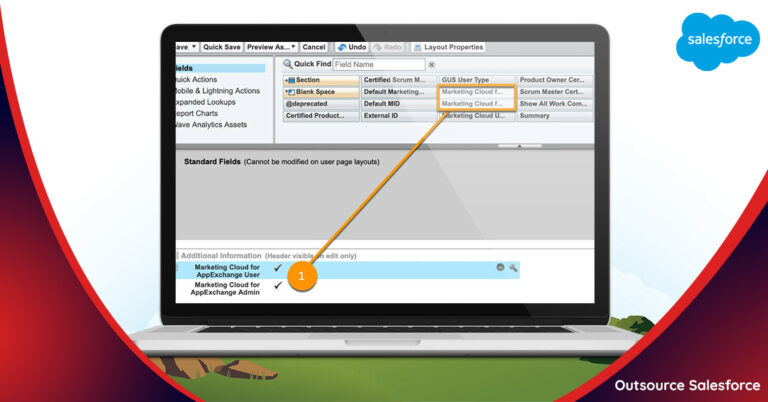
- Click on Setup —-> Click Customize —-> Click users —–> Click Page Layouts —–> Edit the user page layout.
- Add the Marketing Cloud for the AppExchange User field.
- Add the Marketing Cloud for the AppExchange Admin field. Click on Save button.
- Click on Setup —–> Click Manage Users —–> Click Users —–> Edit the Salesforce CRM administrator user.
- Enable Marketing Cloud for AppExchange Users. Enable Marketing Cloud for AppExchange Admin.
- Click on save.
Configuration
Step 3: Set up Salesforce system users
- Go to Set up → Manage Users → Users
- Create new users or update existing users with the following settings. ◼User License – Salesforce ◼Profile – System Administrator
- Click on Save button.
- Now, Edit the Salesforce system user.
- Make sure the user has the System Administrator profile applied.
- Check the Marketing Cloud for the AppExchange Admin checkbox.
- Check the Marketing Cloud for the AppExchange User checkbox.
- Save
Step 4: Log in to Marketing Cloud
- First, go to Email Studio, then Click Admin → Salesforce Integration –> Edit.
- Then select Scope by User if applicable for your data access configuration.
- If prompted, click Upgrade to Connected App ——-> Connect Account.
- Click OK and log in as the system user.
You might be prompted to log in to your Sales or Service Cloud account, if not logged in already.
Step 5: Creating a Marketing Cloud user API
- To create a user account, you need to add a name for easy identification.
- Go to Email studio → Admin → My Users → Create.
- Fill in the reply email and Notification Email field. Then add a unique username.
- Leaving the External ID field blank, Set Time Zone and Culture Code.
- Check the API User checkbox.
- Create a temporary password
In case you are working on Enterprise Edition 2.0, set the below permissions and roles.
- User Permissions: NONE
- Marketing Cloud Permissions and Roles: NONE
- Select Email Application Select Mobile Connect
- Select the Marketing Cloud Administrator role.
- Save the new Marketing Cloud API user.
- Continuing further on setting roles, Click My Users from Email Studio Admin
- Select the Marketing Cloud API User
- Click Manage Roles
- Click Edit Roles and Assign the following roles: Marketing Cloud Administrator
- Save the roles for the Marketing Cloud API user
Step 6: Connecting the Marketing Cloud API user
This includes three steps:
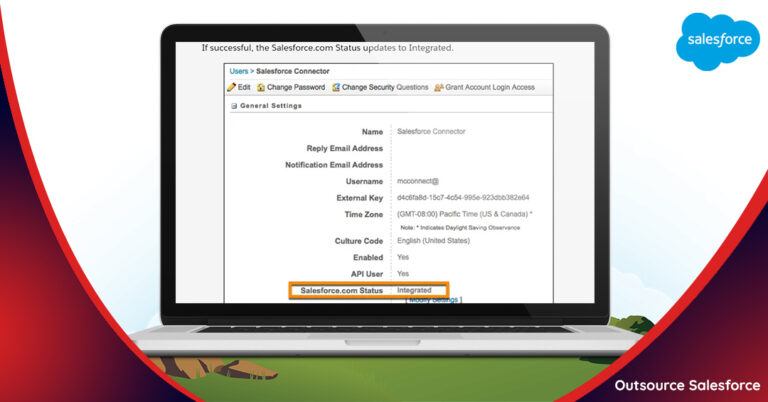
- Go to Email Studio → Admin —> My Users —-> Select the API user.
- Click Integrate for Salesforce.com Status —> Enter the Salesforce system user username —> Save the settings.
- On a successful connection, The Salesforce.com status field will be updated to “Integrated”.
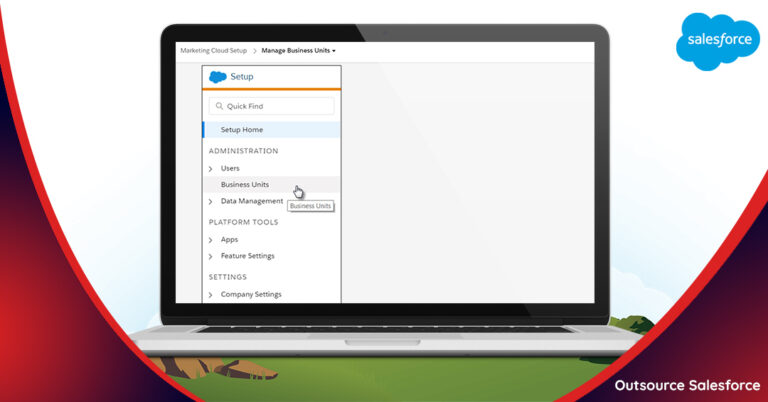
Step 7: Assigning Business Units
- Go to Email Studio→ Admin → My Users→ Marketing Cloud API User.
- Go to the top of the Users table, then click Manage Business Units.
- Make sure that selection under Default Business Unit is the top-level business unit.
- In the Associated Business Units section, select all business units to be used with Marketing Cloud Connect.
- Save the changes.
Step 8: Log into your Salesforce org
From your Salesforce org, go to Setup→ Manage Apps → Connected Apps → Salesforce Marketing Cloud.
- Next, click on Edit Policies —> Under Permitted Users, select Admin approved users who are pre-authorized.
- If a warning message appears, click OK.
- Select Relax IP restrictions under IP Relaxation.
- Under Refresh Token Policy, select Immediately expire refresh token.
- Click Save
- Again go to Setup —> Manage Users —> Permission Sets
- Click New —-> Give the permission set a name. Validate the generated API name and ensure this field has the desired value.
- Save the permission set.
- Again Click on Setup —-> Manage Users —-> Permission Sets.
- Click the name of the newly created permission —> Manage Assignments –>Add Assignments.
Wrap up
We hope you find this guide useful for integrating Marketing Cloud with your Salesforce org.
In case, you need our guidance with Marketing Cloud installation or implementation, do not hesitate to talk to our experts at Outsource Salesforce. Contact us for a demo!